©
2008 www.theCUBEstudio.com
Companion
tips: http://www.theCUBEstudio.com/CrossfireTechTipsForSettingInitialTiming.htm
http://www.theCUBEstudio.com/CrossfireTechTipsForManifoldInstall.htm
NOTE: these instructions are for a stock
Crossfire ignition systems using the factory ECM and ECM chip. Some aftermarket
ECM chips and some User Modified chips completely screw up the behavior of the
ignition system. If you have one of these chips, you will need to get with the
supplier and figure out how you can get your timing set.
Before you get started timing your ignition, you
will need an inexpensive special tool called a ‘distributor wrench’ or some
similar name. These are available at most car parts stores or at Sears. The
cars are partly SAE and partly metric. The engine is SAE.
http://auto.sears.com/Product.htm?catalogId=10625&productId=2017908
Background:
The ignition system in comprised of a computer,
but the computer is spread around in a couple of places. One could think of it
like a PC computer, but with the video card in a different box. The ECM (Engine
or Electronic Control Module) itself is only one of the components. Another
component is in the distributor itself and predictably is called the ignition
module. These go bad regularly and are only $25, so ANY ignition trouble and
perhaps even normal maintenance should include a new module. Sort of in the
same category as an O2 sensor.
If you replace a module, you must use heat transfer paste under the module or you can expect a very short life from it.
The ignition module is a tiny computer powerful
enough to run the distributor and to send information (like RPM) to the ECM.
All it needs is power and an advance signal from the ECM. The ECM has lots of
other data from various sensors and uses that info to make decisions on where
the timing should be at any given moment, so logically, the ECM does the job of
calculating the advance and sends that info to the ignition module. Absent the
advance signal from the ECM, the ignition module will return the advance to a
base line starting point and run the engine that way. So this is the condition
you need the distributor to be in so that you can set that base line timing.
The advance is completely computer controlled and all you are setting is a baseline reference and not the actual timing. Motors do not idle at 6 degreed advance, more like 13 to 17, so in order to allow for setting the base timing, there is a plug that you disconnect in order to stop the ECM from controlling the advance. This wire does not carry the actual advance information. It simply throws a ‘switch’ in the ignition module with connects or disconnects the actual advance wire internally. This ‘switch’ is a part of the module that often goes bad. You cannot see this switch, but you can tell if it is fried by the behavior of the system, which is detailed below.
The procedure to set base timing is really very simple. You disconnect the wire to kill the advance, set the base timing and then reconnect the wire.
Behavior:
With the advance connected, you might barely see the timing mark way up high (off the tab) and when you rev the engine slightly the timing mark should move around decisively. Hopefully the mark is reasonably steady. If it is jumping all over at idle, you have some issues
With the advance wire disconnected, the timing mark is visible at or around the 6 degree mark and revving the engine has no effect on its position. The engine is pretty unhappy at 6 degrees and particularly does not want to rev., so be gentle or you'll stall the motor.
Procedure:
Note: the timing
‘mark’ will refer to the horizontal groove cut across the harmonic damper
(pulley) and the timing ‘tab’ refers to the metal plate sticking out of the
timing cover with the sawtooth edge on it.
1a) loosen the distributor hold down bolt until
you can turn the distributor smoothly with some effort.
1b) connect the timing light according to it’s
instructions. You will need put the pickup clip on the number one plug wire. On
the factory setup, this wire is one of the two in closest to the front of the
car in the distributor cap. It should be the one to the right as you look at
the cap front the front, but it may well have been moved around by a previous owner, so no guarantees. If
you pick the wrong wire, no harm done, but you won’t see the timing mark.
Tip: It is difficult with factory routing to
figure out which wire is number one if it is no longer in the stock position
and tracing it along the engine is impossible. But you should be able to find
and trace the #8 wire which is the farthest back on the passenger side.
Wherever #8 is in the cap, #1 wire is right next to it counterclockwise looking
from the top.
1) Just hook up the timing light, start motor and point timing light at the timing tab. You should NOT see the timing mark on the timing tab. If you do, there is a problem.
The advance wire is unplugged or broken.
The
module in the Dizzy is toasted.
The ECM is confused.
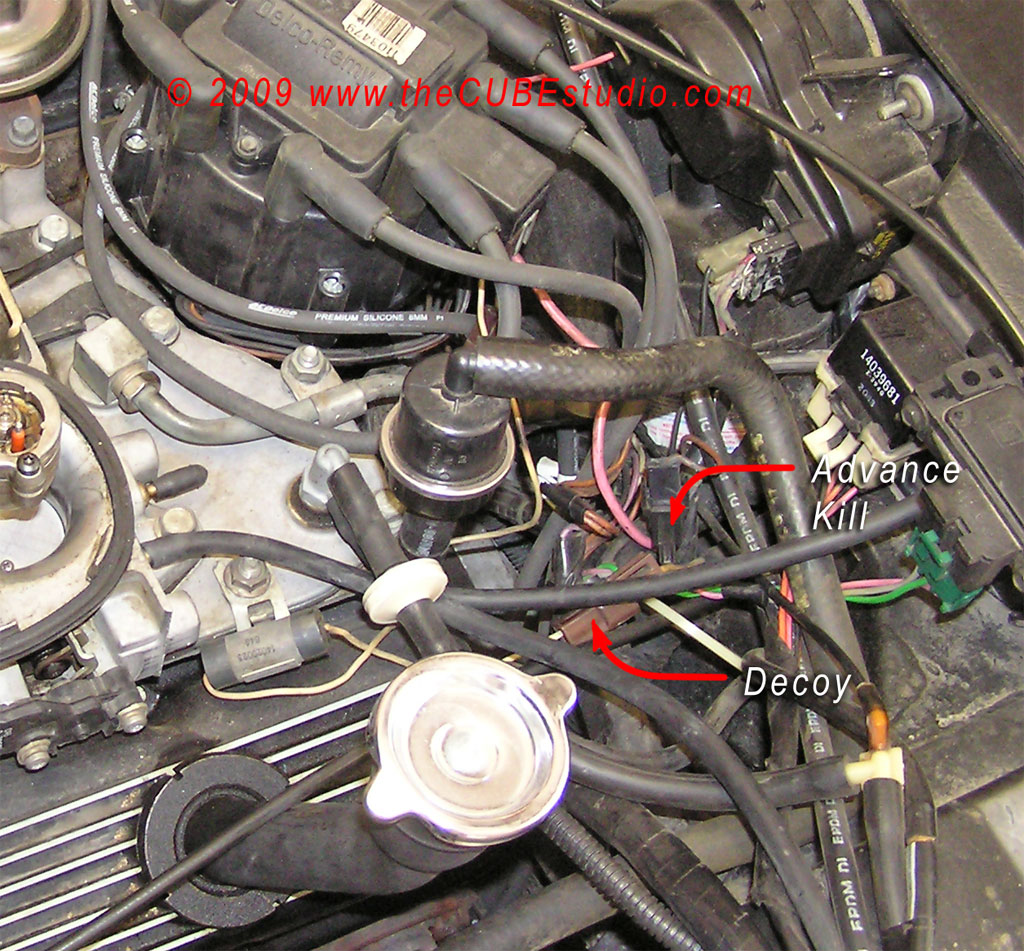
2) Unplug the advance wire. It is labeled in
*most* manuals as 'tan', but to me it looks brown. Do not confuse it with the
decoy wire GM decided to put in the same place. The decoy goes to an ignition
noise suppressor (little round can about an inch long) mounted on the
manifold. This is NOT the advance wire. The advance wire is a single wire
with a single connector hidden in the jumble of wires next to the distributor.
When you unplug it, the engine RPM will drop and the engine will not be a happy
camper.
http://www.thecubestudio.com/CrossfireAdvanceWireLocatio.jpg
3) Set the timing to 6 degrees advanced on the timing tab by turning the distributor slowly by hand.
4) Reconnect the advance wire. The engine should
speed up and get happy.
5) tighten the distributor clamp bolt and disconnect timing light and your done.
That’s all there is to it.
Good
luck!
-
-
Steve
Simpson
If
anyone finds errors in this tip sheet or has some more tips they would like to
see added, feel free to contact me at steve@thecubestudio.com